By Huy Bui
Motlow Buzz Reporter
Hey everyone! My name is Huy Bui at Huy Bui – Freelance Motion Designer and Video Editor. I started working on motion design, video editing, and visual effects in 2012 as a hobby. Since then, it has grown into a passion and my dream career. All of my knowledge and skills come from online tutorials, blogs like Video Copilot and Creative Cow, and my own experiences with various software.
My favorite go-to program for motion designing and video editing is Adobe After Effect. You can also use Adobe Premier, designed for video compositing and editing. However, as far as my experience goes, I’ve found Adobe After Effect can do everything Premier can do, just as a more advanced workplace and parameter. Adobe Premier is great for beginners, or for individuals who just want to do video editing and compositing. For advanced motion design and visual effects, After Effect is one of the best choices out there.
After Effect's user interface
Adobe After Effect has the power to edit, cut, color correct, color grade, add visual elements to footage or the composition, add 3D visual effects and many more. Because After Effect can utilize third-party plug-ins, it can do almost anything from basic video cutting and compositing to complex 3D animation and rendering. I will be focusing on this program in this article. It is not as hard to use as most people think. When you get familiar with the After Effect’s user interface, shortcuts and the plug-ins, it will be very easy and straight-forward to use.
We will start with the first step of creating any kind of contents, importing your project file, and setting up your composition. To the far left side of the program interface, you will find the “Project” tab. It is where all of your footages, compositions, layers and assets will be stored. To import your files, you can double click on the empty space on the “project” tab, or go to File > Import. You can import a wide variety of media files such as mp4, mp3, png, jpg, mov and many more. After getting all of your files imported, you are ready to create a composition.
Think of After Effect as the way you cook. Everything in the “project” tab are your ingredients, all original, raw, fresh and unseasoned. “Composition” is like your kitchen or where you cook. A kitchen is where you start using your ingredients. You can cut, mix, season, fry and boil your ingredients, then put them all together for a finished meal. Likewise, “Composition” is where you work with your “ingredients.” You can cut, mix, copy, edit, and time them. You can even create your own elements in After Effect. They will also be stored in “Project.”
You can click on the “composition” button underneath the project tab, or you can go to Composition > Create New Composition. From there you can pick out a preset for your comp, or you can customize it yourself. After Effect comes with a variety of video presets, including dvd, 1080p, 2k, 4k and more. However, you can set it to your desired resolutions, frame rate, duration and aspect ratio. Frame rate is essentially how many frames or images are there in 1 second. The more frames per second or “frame rate,” the smoother your video will be. The movie industry standard for cinematography is 24fps (frame per second). Most smartphones nowadays shoot video in 30fps or 60fps. The number can even go higher with professional cameras. Aspect ratio will define the “Shape” of your video. It is the ratio between the width and height of your format. Wide-screen format will have an aspect ratio of 16:9 (16 width value to 9 height value), which is what everything is formatted into in the modern day.
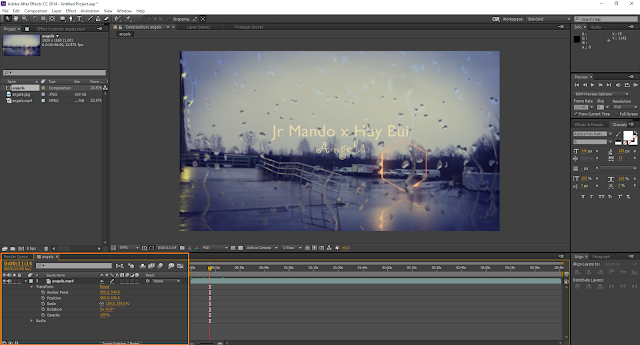
After creating a composition, it will appear on your timeline as a blank document, and the review screen will be empty. That changes when you drag and drop your files from the project windows into your composition and start working on them. You can use your mouse to drag and drop each layer around the timeline, cutting it by using CTRL + SHIFT + D, or duplicating using CTRL + D. You can adjust the parameter of each layer, including scale, position, rotation, opacity, and or 3D parameter if you are working in a 3D environment.
The preview and timeline tab for your composition
“Scale” will let you control the size of each layer in your composition. You increase the percentage to make it bigger, or decrease the percentage to make it smaller. There are actually 2 percentage values in “Scale”, one for width and the other for height. They are linked together by default, so you still maintain the same aspect ratio when you “scale” it. “Position” will let you control where your layers will be in the video. It has X, Y and Z parameters (if you are working in a 3D environment). X is horizontal, Y is vertical, and Z is depth. Rotation is quite straight-forward and self-explanatory. It will let you rotate the layer to however you want. Opacity will let you control the “appearance” of the layer, with 100 percent being fully appeared, and 0 percent being fully disappeared. The percentage between them will give the “ghost” effect.
 |
| Basic parameters for any layer |
There is a very easy platform for animating almost any parameter in After Effects called keyframe. For example, say that you want to animate the scale parameter of a layer so that it looks like the layer is expanding largely. You can adjust your time indicator on the timeline to where you want to begin your animation. Once you have done that, click on your layer and press “S” to bring up the scale parameter, then you can start a keyframe by clicking on the stop watch button before scale. When you progress your time indicator and increase the layer scale, it will automatically create another keyframe as you are making changes.
How does keyframe work? The value set on parameters at a certain time will shift along with your inputs. In this case, the original keyframe we set earlier has a smaller scale than the second keyframe. Therefore, as you move your time indicator through the timeline, you will see the scale value is increasing between the two keyframes. That is the basics of compositing layers and assets. From there you can start putting in desired effects accordingly. It can be color grading, shading, color correction, animation, etc. After Effect potential is virtually limitless.
It is very important to color correct and color grade your videos. It will add more details to your work and give it a cinematic feel. Depending on the mood or content of the scene, color grading might vary. For example, you might want to color grade your video to a warm color scheme for an action scene, or blue color scheme for a relaxing scene.
 |
| The effect list |
Many people confuse color correction with color grading. Color correction means correcting the contrast, brightness, highlights and shadows to the desired look. For example, your original footage might be too bright, so you will color correct it to be darker, adding more contrast, etc. Then you can proceed to color grade your video after correcting it.
 |
| Drop-down list of effects under Color Correction |
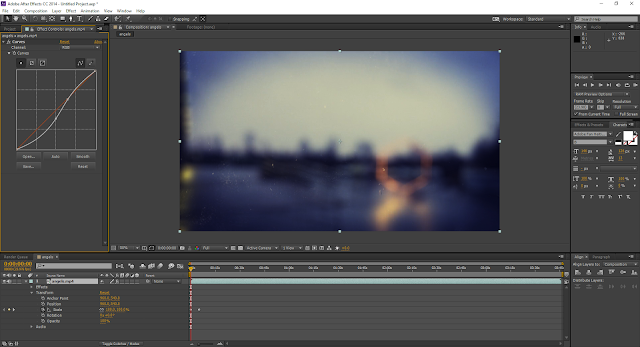
 |
| Using the curves effect |
After you’ve finished working on your composition, you can save it as a project file, a very small save file that will let you save all of the work you have done. It will also let you open your project and composition as you last saved it by clicking File > Save. You also have the option to export your composition into a media file. Using the “add to render queue” under the composition tab, you can choose your media export file type such as avi, mp4, mov, etc. You also can tweak with the quality, resolutions, audio quality and frame rate as well. Then there you have it, the basic steps of video editing in Adobe After Effects.
You can also check out Andrew Kramer’s amazing After Effect and 3D tutorial at http://www.videocopilot.net/. He is a VFX and motion design genius. My personal work and skills are heavily influenced by him. There are plenty of tutorials ranging from graphic design and motion graphics to visual effects and 3D animation.
Another great site for blogs and tutorials on After Effect is Creative Cow. You can check out their library here https://library.creativecow.net/. Creative Cow is a large community that consists of visual effect editors, motion designers, filmmakers and 3D animators. They have many useful articles and tutorials that will strengthen your editing skills.


No comments:
Post a Comment